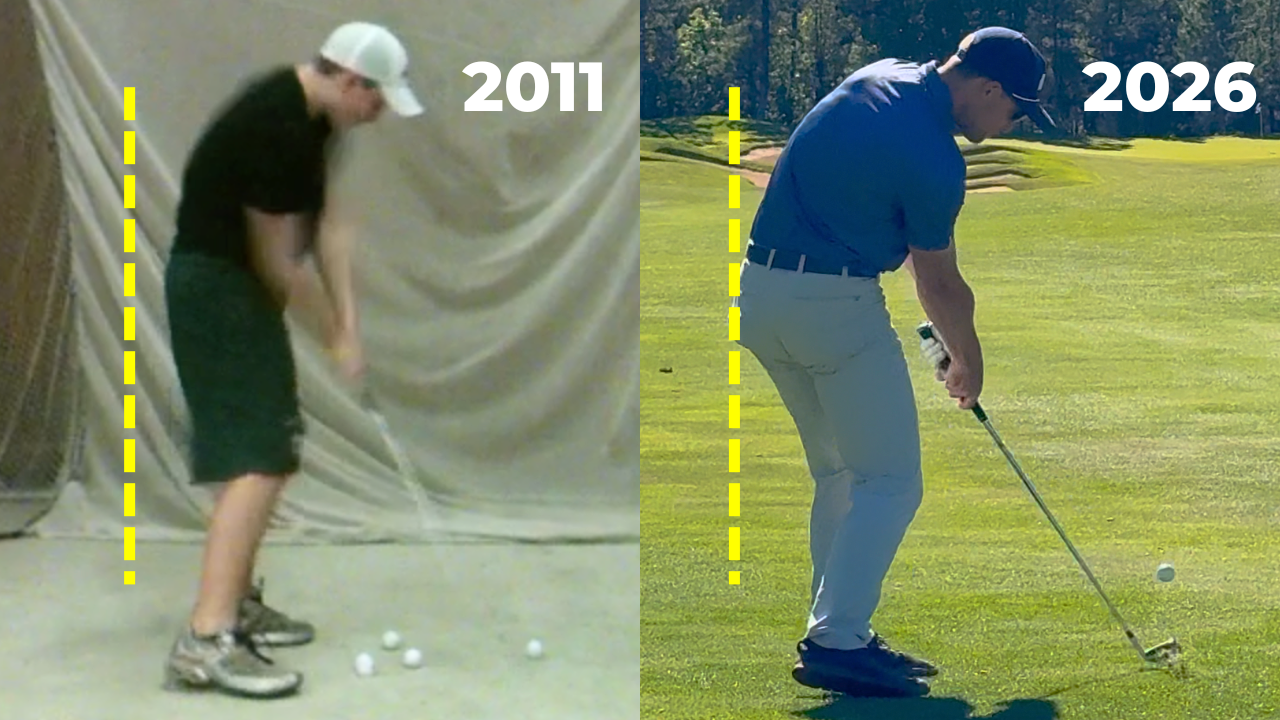
Early extension is one of the most frustrating feelings and faults you can have in the golf swing. But today, I’m going to share with you the exact steps and Tour-proven drills I used to finally fix it.
Why I Used to Early Extend in My Golf Swing
For as long as I can remember, early extension has probably been the #1 problem in my golf swing. This frustrating habit goes all the way back to my junior golfing days…
And for the more than 26 plus years I have been playing golf, I really believe this specific thrusting (“goat humping” 🐐) pattern has been the single biggest issue for my ball striking and consistency.
For me, my right side always wanted to push so hard, both toward the golf ball and the target. It was both a slide and a thrust happening at the same time out of the top. My head and chest would respond by backing up and out of the shot.
This led to inconsistencies, like: chunks and thins, blocks and snap hooks with my driver, and pulls and weak right shots with my irons.
Compression, control, and balance were all lacking. I was still a scratch or better golfer, and still winning junior and college tournaments, but it was anything but reliable. Plus, it just felt bad and I wasn’t confident in my swing.
If you are like most amateurs (and like me) then you know the feeling all too well. You transition into your downswing, and rather than keeping your space, flexing and turning, your lower body and pelvis moves toward the ball. You come out of your spine angle, and you stand right up at impact. Not only does it cost you shots, it just feels terrible, even painful in some cases! If you’ve ever experienced low back pain in the golf swing, then chances are extension of some variety is contributing.
But I’m here to tell you it doesn’t have to be that way. I’m living proof that real, lasting change can be made…

But do the world’s best golfers work on this?
Yes, even the best golfers in the world (as you’ll see when reading along) are concerned with reducing early extension for better ball striking and injury prevention. So today, I want to share with you my personal experiences, insights, and the drills Tour pros also use, that finally helped me break away from that thrusting pattern.
After tons of trial and error, you’ll see what actually made me keep my hips and butt back once and for all, and maintain my posture through the strike for not only a better feeling and better looking swing, but also a better performing swing––with more consistent ball striking.
Early Extension Golf: What Is It and Why Does It Ruin Your Swing?
To understand how to fix early extension, first we must define what it is. We have to look at what is actually happening to your body during the golf swing.
Start by imagining a line behind your tailbone in the golf swing from setup to finish. Well to keep it as simple as possible for our purposes, you can think of early extension as basically what happens when you come off that line in the golf swing.
You’re effectively losing the depth in your pelvis. For some that even happens or starts in the backswing, but for many the move away from that imaginary line happens (or greatly increases) in the downswing. Compare that with say Sam Snead in the image below who moved tremendously in his hall-of-fame action.

Now, to be clear, some amount isn’t necessarily bad, and when you look throughout the history of golf you’ll see plenty of hall-of-fame swings that featured some amount of it. Jack Nicklaus for example. But, too much can be disastrous, and I’m sure you wouldn’t be reading this if your early extension wasn’t costing you shots––and probably many shots every round.
Besides your lead hip and trail hip moving into the golf ball, early extension also tends to bring about numerous other issues in the swing, as was the case for me. Not to mention, early extension can cause shots to be thin or heavy, and result in a slew of ball striking problems.
Some side effects of moving into the golf ball, include:
- Takes away the space for your hands and arms to return, and causes the club handle to rise through impact.
- Causes your sequence and balance to get off as your weight and pressure move to your toes, even causing you to almost fall over.
- Makes it impossible to maintain your spine angle, causing your head and chest to back out of the shot and lose sight of the golf ball.
- Stalls your rotation and leaves you feeling stuck and yippy.
- Causes you to flip your hands and arms at the golf ball, leading to an unstable club face and struggling to make ball first contact.
Once you invade that “sacred area” in front of your body, your hands, wrists, and arms so often have to work overtime just to make good contact. And this generally leads to an unstable, unpredictable club face, swing path, and low point (or bottom of the arc). Early extension also typically reduces power by hampering body rotation and your golf swing sequence.
So, can you still play good golf with some of these “issues”? Of course, but generally speaking, I would say most (like me) realize there’s a better way.
The Key Move I Found to Fix Early Extension
So before I dive into the golf swing drills that really helped me fix early extension, I think it’s important to first see and feel what we are really after. I think many golfers, and early extenders go wrong here. Many drills can work great, but having an understanding of the feels and mechanics we are after can expedite the improvement process (as it did for me).
In my opinion, what we are looking for especially in transition and the downswing, is more of a hinged state, where our chest is on top and in front of our pelvis, and our butt and hips are back. You could think of some workouts in the gym for this, such as: a bodyweight hinge, RDL’s, deadlifts––all of which can be excellent in helping your cause. Many PGA Tour golfers swear by those workouts in the gym for this very reason.
And while many amateur golfers wanting to eliminate early extension just tell themselves to “keep your butt back”, that generally fails. Over the years, I’ve discovered a better approach is to attack the issue head on and work towards more of a hinged state, almost making the angle between my chest and thighs more acute (see below).

So yeah, for most golfers wanting to better stay in posture the focus is traditionally on the hips and butt. We all remember Tiger once talking about “activating the glutes” for a similar reason. But for me it’s just as much about the role of the upper body. I want to feel like my chest is on top of that golf ball.
Sneaky Contributors to Early Extension (Must Know!)
So while early extension can be fairly easy to spot in a golf swing, keep in mind that there may be more than one cause or contributor. Many will tell you the common causes of early extension include lack of hip mobility and an overactive upper body, but I think there’s more to the story. As you work to fix your early extension, you may also have to blend in some of these other matchups to find lasting change. Here are some of the biggest contributors I see.
Poor Posture:
Many golfers who early extend begin with an overly bent over posture and standing too far away from the golf ball. This is nearly impossible to maintain and most in my experience will want to drive their right hip and left hip in toward the ball because of it. Golf posture is not like what we see in other sports. We want a fairly rounded, relaxed posture directed at the ball, yet still primed. This gives you the ability to more easily turn in bend and on plane.
The straight back, butt out won’t help you prevent early extension. I see golfers and students from here generally setup in some anterior pelvic tilt, chin and head up on the horizon, and subsequently want to turn too flat in their swing.
So instead, find a nice athletic, yet relaxed posture like the great ball strikers––this is a critical starting point in my opinion! Below is an image of my colleague, Milo Lines demonstrating the bad, side-by-side with Tiger Woods showing the good.

Overactive Trail Arm:
This is a big one! If your trail arm (generally golfers’ right arm in golf swing) and wrist is pushing, throwing, lengthening, and you’re seeing an early release (think casting and flipping) out of the top, chances are you’ll want to rise up to make room. You’ll also struggle to create shaft lean and compression naturally.
Having a more passive and bent trail arm and wrist in the downswing and into impact matches up much better with staying in posture. I would guess more than 90% of the students I work with struggle to command their right arm and overuse it in the golf swing (here’s a video I made on this).
See Bobby Jones and Sam Snead below arriving at impact with a still bent right arm, allowing them to stay in posture and cover the golf ball with their chest. Two legends at work there!

Incorrect Ground Force & Trail Foot Push:
If you push hard out of the ground early in the downswing, think like a jump, then you will most definitely early extend and chances are your pressure will move towards your toes. Another push to consider is the one of your trail foot. This was a problem for me for many years, causing me to also slide.
Better golfers use the ground differently. They are instead “settling in” in transition, almost flexing down a bit more into their hips and legs so they can rise, and extend later (if needed). For this I like to imagine similar athletic movements, such as: a snowboarder in a halfpipe, a surfer riding a wave, or a figure skater preparing for triple axel. Think about it, you can’t make an explosive move out until you dig in first.
Head and Eye Movement:
If your eyes and head are used to pulling up and out of the shot they’ll likely need to be trained at slower speeds to stay out and down. This isn’t to say your head should stay down forever or can’t move at all, but the pulling up and back of the head tends to coincide with driving the pelvis in. Look back to the Bobby Jones and Sam Snead side-by-side image above to see some legendary head and eye movement through impact.
Stalling and Staying Closed:
Lastly, if you prevent yourself from freely unwinding and are trying to stay closed off, chances are you’ll thrust in toward the ball. Some will say you should keep your back to the target, or your shoulders closed through impact, but from my perspective the best ball strikers in history didn’t do those things. Plus, as I’ve always thought, why restrict motion when you can swing freely and like an athlete?
A big breakthrough for me was learning that I could in fact open my chest and even turn my shoulders open through the shot, so long as I turned in bends (or on plane). Plus, it made my swing feel much more free. Check out the difference in the image below from 2018 to 2024 and you’ll see more chest turn, more space, lead hip more back and around, and two butt cheeks at impact in the latest version.

So there are probably many more contributors we could cover, but these are the biggest ones that come to my mind that could also be holding you back (or should I say, pushing you in toward the golf ball). Now let’s get into some essential golf swing drills to really fix your early extension.
Golf Drills That Actually Work!
Having played golf for more than 25 years now and coaching for much of that, I’ve tried almost every method, drill, and tip under the sun––but these are the golf swing drills I’ve found to be best at actually eliminating early extension.
Recommendations: when doing any of these drills, I highly encourage you to go slow, feel relaxed and fluid vs tight, and separate yourself from the results of the ball flight. Our focus should be on building a new movement. The golfers I’ve seen over the years who have made real lasting change in any aspect of the golf swing follow these important training prerequisites.
Essential Training Movements (Pizza Wedge, Wall Drill, Resistance Band)
Now before we rush into some drills where we hit a golf ball, I think it’s important to build the actual movements and pattern that will actually fix early extension. Hopefully you are here for the long run and committed to fixing this issue, because I’ve found that just hitting balls and “finding it in the dirt” is not enough. You have to build a new pathway, and this is what worked best for me. Yes, it will take time, but your body and game will thank you for it.
The Pizza Wedge Drill for Neutral Swing Path
To me there are some core drills without hitting a ball that every golfer could benefit from for more consistent ball striking, and a more reliable swing. This is one of those drills!

Start by sliding an alignment stick 50-50 through your belt loops on your front side. Hold the second stick against your chest about even with your sternum with your arms crossed. As you wind up into your backswing, point the chest stick down toward a spot about one club-length outside where the golf ball would be.
The stick through your belt loops and the stick on your chest should make a crisscross here, forming a perfect “pizza wedge” shape. This ensures you are winding and turning in bends, or on plane (see image above––left). From here, now land and unwind into your front side (see image above––right).
This simple exercise stops your shoulders from flattening out and prevents your lower body from sliding toward the target line. It keeps you stacked, centered, and perfectly stable through the strike, and will help bring about a more neutral, repeatable swing path.
Again, early extension in my opinion is not just a hips in golf swing thing, it’s also an upper body and lower body systematic pattern. This golf exercise gets everything in order!
The Wall Drill to Maintain Space
Another good, simple drill is a wall drill. You can also do this with an exercise or yoga ball as well to train yourself to better maintain space in your golf swing. Again, no club or ball here. To start, make a fist in one hand and put it about on your tailbone then back up until you are touching a wall in good golf posture.
From here have your hands return in front of you or hug yourself and make some air swings with your body where you try and stay close or even push slightly into the wall in your swing. Again, this is opposite of moving toward the golf ball. Check out my colleague, Milo Lines demonstrating this drill below as he gets into proper golf posture.

By moving away with your middle you are exaggerating the opposite––just as if you were slicing the golf ball, I’d work with getting you to hit draws for that same reason. Practice the wall drill for 5-10 minutes daily and your posture and pattern will improve.
The Resistance Band Drill for Lead Glute and Trail Glute Activation
This is one of my favorites to build new patterning and understanding. Plus, it’s a challenge, which I like. In golf coaching, I like to think that there is “assisted” and “resisted” forms of instruction…
So basically, sometimes I will help or aid in my students’ movements, and other times I will fight or combat them to bring about a desired outcome. Both can work, but I would say that once you have a general understanding of a new pattern, the challenge or resisted approach can be more productive.

Use a light to moderate looped resistance band and wrap it around something heavy and stable somewhat low to the ground. Now step inside the band and position it across the top of your glutes, right under your belt (image above). The band will constantly be pulling you forward toward the ball and target line, but you’ll need to fight this. You’ll have to dynamically engage your lead and trail leg, your glutes, and your back chain to keep in posture.
Even Tiger Woods Trains it…
This golf exercise reminds me of when Tiger Woods said, “It’s just my glutes are shutting off. Then they don’t activate and then, hence, it goes into my lower back. So I tried to activate my glutes as best I could, in between, but it just they never stayed activated.”
This is something he worked on quite a bit later in his career, especially after his back troubles to keep space and take pressure off his low back in the golf swing. While not explicitly saying it in his quote, regarding early extension, it often results from a lack of depth in the backswing, something Tiger really wanted to fix (see image below).

This is the complete opposite move of what most early extenders do! From here, perform slow winds and unwinds inside the band. You could place a club across your chest if it helps. This also instantly shifts the pressure in your feet away from your toes and pulls your center of mass back into a stable hinge state.
Notice in the image above my head and chest are still out, don’t cheat and simply come out of your spine angle to pull the band back. This drill does wonders in my opinion and will really give you the feeling of that chest-to-thigh angle I talked about at the beginning of this blog.
Hitting Drills for Early Extension (and Good Golf!)
Now let’s get to the part where you can actually fix early extension while hitting a golf ball, using swing drills that will give you more space and keep you in the shot. These are some of my favorites!
The Choke-Down Drill
One of the most effective tools I’ve found to combat early extension requires no fancy training aids—just your club and a golf ball. I call it the choke-down drill, and it relies on an extreme exaggeration to force your body into a proper hinge state.

Step 1: Take your normal golf stance and grip. And normal posture.
Step 2: Slide your hands all the way down the handle just above the shaft.
Step 3: Place your lead pointer finger right at the bottom edge of the handle.
Result: You have effectively shortened the club by about 4 inches.
By shortening the club so drastically, it becomes almost physically impossible to hit the golf ball if you early extend. If your pelvis shoots in, you will probably swing right over the top of the ball and miss it entirely unless you really fire your hands and arms at it––so don’t do that, haha. For a solid strike, you’ll have to flex your knees a bit, keep your pelvis hinged, and keep your chest down on top of the ball.
Scottie Scheffler (image below) even does a similar drill where he adds an extension onto the end of the grip to help cue himself to retain space and return the handle. So yes, even the top golfer and world #1 players are concerned with maintaining space and not moving so much toward the ball in the downswing.

How to Practice This Drill Safely
- Start Off a Tee: When you first try this, put the golf ball on a low tee. This saves you from having to lower your body too aggressively right away. In fact, I recommend golfers do most drills slowly and off tees (especially at first).
- Commit to Shorter Distances: Do not try to smash full shots. Make slow, deliberate full swings to feel the lower handle, the bent right arm and wrist, and the hips back through impact.
- Engrain the Feeling: Notice the feeling you are creating to retain the room for your left arm and right, and the club in this drill. Master this feeling and add it into your practice swings as you look to transfer this new motion to the golf course.
The Chair Drill
This is a staple in the golf instruction world, but for good reason. It 100% works, yet most golfers I find are too impatient to see it through, think it looks too silly, or just give up too quickly after poor results. Again, the ball flight in these drills is less of a concern at first, we are more concerned with building a new pattern, and this chair drill can help.

How to Execute this Drill
- Place the backside of a chair directly behind you at address.
- Position it so the back of the chair sits roughly one inch away from your glutes or just grazing you as you stand in good golf posture.
- Hold the club as normal, or for an advanced version, take a slightly choked-down grip on a short iron.
- Make a big slow swing, focusing on winding up in the backswing where your trail hip bumps the chair. Then transition where both hips touch the chair, and then continue to push the chair back with your lead hip and lead glute.
This drill acts as an excellent physical guide, and serves as sort of a “resisted” approach drill where you have to work a bit harder to achieve the pattern we are after. Think of the chair as a sort of feedback mechanism, and these feedback mechanisms can help identify thrusting movements during the swing.
The Belt Loops Drill w/ an Alignment Stick
Over the past 20 plus years, I have tried hundreds of golf swing drills. While many of them are great for specific, isolated fixes, this is one Tour-proven exercise I use maybe more than any other, and can fix so many issues (just like when you early extend) in the golf swing.
In the past you may have even seen elite touring professionals like Wyndham Clark, Patrick Rodgers, Jake Knapp, Tom Kim, and Phil Mickelson working on variations of this exact movement––and I even made a full video on just this drill because I think it’s so good!
It is called the belt loops drill, and it is the ultimate “space maker” and “synchronizer” for your golf swing. Whether you are battling early extension, sliding in your swing, or struggling with a stuck right arm, I’ve seen this simple drill act as a cure-all.

To set this up, take a standard alignment stick and thread it through the front belt loops of your pants or shorts. Make sure the stick is resting relatively 50/50 across your waist.
Safety Note: I’d recommend you have a protective rubber cap on the trail end (backswing side) of the stick, and don’t let it sit too close against your trail side. This will prevent the sharp stick from cutting your right arm and right elbow in the downswing.
Check out the images above and below of myself and U.S. Open champion, Wyndham Clark.

How to Execute the Belt Loops Drill Without Getting Frustrated
If you step onto the driving range, put a stick through your loops, and immediately try to smash full-speed drivers, I guarantee you are going to get incredibly aggravated, or even tear your pants. You will likely hit the stick with your arms, lose your balance, and give up. You must build the new pattern one step at a time and go slowly!
Step 1: Start with Air Rehearsals
Before you even look at a golf ball, make slow practice swings without a club. You want to feel the stick staying back as you wind up, transition, and move through into your finish. The stick isn’t meant to inspire you to spin like a top, and rotate hard, it’s meant for space and to sync up your upper and lower body.
Step 2: Make Smooth Swings
Start with a ball on a tee using a short iron and make slow, full swings building on the air swings before it. Focus entirely on the feeling and the space, completely ignoring where the ball goes. At first, your shots might only carry 20 or 30 yards, which is exactly what you want.
Step 3: Gradually Add Swing Speed
Once you can cleanly complete a slow swing without invading your space and your right elbow clipping the alignment stick, you can begin to increase your swing speed.
I should say, this is a very difficult drill, especially at first––but the rewards are awesome if done correctly. I cover this more in the full video. Please go slow and focus on the movement!
Additional Swing Feels That Help Get Rid of Early Extension
Here are a couple other feels I really like and have used to further fix early extension and better transfer the movements and drills above onto the golf course.
Move Your Hips in Golf Swing “Back, Back, Back”
It’s easy to assume the goal of the hips in some of these exercises is to create aggressive hip rotation or spinning. While yes, we want to clear, space is equally important. Instead of thinking about twisting and rotating, think of moving your hips backward and around, away from the ball. This will create the rotation you are after for free.
- The Backswing: As you wind to the top, feel your trail hip and right hip socket move back and slightly on an angle towards the target––maybe 45 degrees or so. We sometimes refer to this as “right pocket back”.
- The Transition Point: When you begin to land into your lead side, try and keep the trail hip back as your lead hip begins moving back to meet it. This creates that hip hinge state we talked about earlier.
- The Through Swing: Now get your left hip further back to clear and follow through up into a balanced finish.
- The Mantra: Think of this sequence as “back, back, back.”
If your hips are staying back, your pelvis will naturally rotate open on its own and you can focus more on the chest to be the rotator, leaving your centers more stacked up.
Playing the Slope: Using Different On-Course Lies as a Natural Fix
You don’t always need golf drills and exercises to correct a forward movement in the downswing. You can also use the natural contours of the golf course to provide instant feedback. The next time you are on the driving range or course, find a side-hill slope and hit some shots first with the ball below your feet (see below for indoor training). For many amateurs this shot is extremely difficult.

When the ball is below your feet, gravity naturally tries to pull your upper body and chest forward over the cliff. If you early extend and find your hips thrusting forward from this lie, you will immediately lose your balance and fall forward making your downswing almost exclusively dependent on your hands and arms. Most players believe it or not actually pull the golf ball off this lie, especially with their shorter irons as they are combatting this excessive move down the hill.
To hit a clean shot from this stance, your lower body is forced to stay more grounded (almost flat-footed). Your knees and hips stay more flexed, and you have to retain space for the club to return. For these reasons, I see this as another highly effective form of “resisted” training. This sort of lead foot and trail-foot pressure drill also enhances hip depth in the backswing where early extension often begins.
Conversely, you could also hit shots with the ball above your feet as well to support your understanding of the swing being on an incline plane, and to better route your hands and arms in unison with your body. I’ve found both of these approaches to be super useful over the years.
My Favorite Training Aid for Early Extension
To preface this, I should say I don’t typically love golf training aids. There are a few that we like at Milo Lines Golf and that I use in my golf lessons, but there aren’t many. The GBOX however is one of them! While I generally prefer fewer training devices as a coach, this specific belt is highly effective at combatting early extension and a stuck trail arm.
Similar to the belt loops drill, the George Gankas designed GBOX encourages you to flex into the belt to keep space and the box back. Use this one for a more synced up swing, better rotation, a cleaner trail arm action, and more room in the downswing.

Your Weekly Blueprint to End Early Extension
Understand that fixing a deep-seated swing issue takes consistent, structured effort over time. The change you saw in my swing took months and even years, and I still work on the same patterns to this day. You can use this structured 45-min weekly layout on the driving range or your home practice net to safely integrate these patterns into your full golf swing.
Phase 1: The Warm-Up (5 Minutes)
- Begin with a minute or two of bodyweight hinge warm-up exercises, such as: hinges, RDL’s, or the resistance band drill.
- Perform the pizza wedge drill to build the movement pattern, and use a wall or chair to further advance.
2: Slow Drill Swings (20 Minutes)
- Grab an eight iron and choke all the way down to the metal shaft and perform the choke-down drill first with half swings. Then transition to big, slow 25% speed swings feeling the “back, back, back” motion, only carrying each shot 30 yards or so. You can gradually build up the distance once it’s feeling pretty good and you have plenty of space. Hit about 10-15 of these.
- Now mix in a chair behind you or the belt loops drill to further challenge your motion and synchronize your swing. Again, go slow here and begin to fine-tune the feeling for the fuller shots and swing ahead. Hit about 10-15 of these.
3: Full Swings (20 Minutes)
- Now that you’ve built up to a fuller swing and greater speed, keep focusing on the movement and the “back, back, back” sensation. Don’t go all-out quite yet, work up to that speed. For every shot you hit make 3 highly exaggerated practice swings keeping your butt back, further engraining the feeling to fix early extension. This should also be your practice swing on the golf course if you truly want to make lasting change.
- I would also recommend using your smartphone or iPhone camera to record every tenth shot or so from down-the-line to visually verify that your spine angle is improved and your pelvis is staying more on, or even behind the start line throughout the motion.
Where to Go From Here
Again, be patient with your progress when it comes to fixing early extension. I have personally trained these exact movements for over a decade to refine my ball striking. Stick to the plan, commit to practicing slowly, and you will finally secure the room your swing needs to play better golf. Things like more shaft lean, compression, a neutral swing path, and a more stable club face are all within reach…
And yes, many of the golf drills outlined in this blog are NOT EASY. But then again, golf is not easy. I wish there was a magic pill for early extension, but there is not. It takes time, commitment, and proper training––but I think the tips I’ve shared here can expedite the process. Follow my roadmap and I believe you’ll fix early extension for good!
For Personalized Help With Your Game…
I’m Henry Fall, and I’m dedicated to helping golfers of all skill levels through a personalized approach blended with our athletic swing principles. Whether you are a local here in Mesa, Arizona, or a golfer on the other side of the world, I am here (along with our full team at Milo Lines Golf) to provide the roadmap you need to strike the ball with more confidence. You book 1-on-1 golf lessons in person at Dobson Ranch Golf Course and Back Nine Golf in Gilbert, where I offer comprehensive coaching tailored to your unique swing. Or join us for a golf school for an unforgettable experience!
And, for those who can’t make it to the desert or would like an actionable step-by-step program, join our Online Academy today for instant access to our full swing playbook, The Athlete’s Swing® plus personalized swing analysis every 2 weeks! Don’t let another season pass you by. Book a lesson, attend a school, or join our Online Academy today and let’s level up your golf game.
Leave a Reply